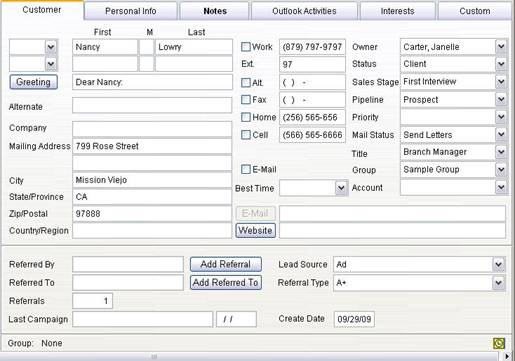
The Customer screen contains general fields such as names, addresses and telephone numbers.
Personal Title
Click the list preceding the first name field and highlight the desired title, if any.
Names
First names are spell-checked automatically, and are compared with personal titles to make sure they match. For example, if you select Mr. and the first name is Nancy, a message appears indicating that the title is male and the first name is female.
After entering the Customers last name, press F2 to copy the last name to the co-Customers last name field.
Greeting
The Greeting field is used as the salutation in letters to Customers. Greetings can be formal or informal. For example, Dear Mr. Smith is a formal greeting; Dear Robert is an informal greeting. The type of salutation is determined by the style you select. Select Tools/Options and the Printing tab to set this option. The greeting field is created automatically when you save the record or when you click the Greeting button. You may also type in a different greeting if you prefer.
Create Date
Market Quest automatically enters the date the Customer record was created. This date is important because it is used to select records by various reports.
Addresses
Enter the mailing address. All letters are sent to the mailing address. When you enter a zip code and the Automatic Zip code feature is enabled, the city and state information is automatically entered. If the zip code is not in the database, you can add the zip code to the list.
You can also enter zip codes into the zip code database through the Modify Lists feature. Select Tools / Modify Lists and customer or contact lists.
Phone Numbers
Enter the phone numbers for the customer
Best Time
Select the best time of day to contact this person.
Best Way to Communicate
The checkboxes next to the various phone numbers indicate the best way to contact this person. For example, mark the Home checkbox if this person prefers to be contacted at home.
E-mail Addresses
Enter the E-mail address for the customer and co-customer.
Click E-Mail to create a temporary e-mail message.
Owner
This is the registered owner of Market Quest.
Status
Select the appropriate descriptor from the Status List:
· Client: The customer is currently doing business with you or is a past customer.
· Prospect: The customer is a potential client
To create additional Status types, select a blank status from the list. Then type the new status value and press Tab. You can also add values by selecting Tools \ Modify Lists \ Customer Lists and then select Status.
Sales Stage
Select the sales stage that represents where the customer is in the sales cycle.
Pipeline
The pipeline field used to categorize clients and prospects. You can add pipeline values.
· Prospect
· Invoiced
· Sale
· Sale in Process
· Withdrawn
· Return
Priority
Select the priority for this customer. Priority can be set to High, Medium or Low depending on the level of interest.
Mail Status
The Mail Status field allows you to choose whether or not a person will receive letters. If you want a person to receive letters, select Send Letters. If you do not want a person to receive any letters, select Dont Send Letters.
Title
The customers title.
Group
Classify customers and prospects with the group field. This allows you find people who belong to a specific group for look up or for special marketing campaigns. You can add group values to this field.
Account
The account field is used to further group customers and prospects. For example, you can group customers and prospects by business name and use this for look up or for marketing campaigns.
Lead Source
Contains the source of the lead. To add an item to the list of sources, enter the new source name and press Enter.
Referral Type
This field classifies the customer based on how much business he or she gives you. Possible classifications include customer, client, or advocate. You may also add other classifications.
Referred By
Contains the name of the person who referred the customer to you. Click Add Referral to assign a customer or contact as the referring person. You cannot enter the name of the person into this field.
Referred To
Contains the name of a contact to which you referred this customer. For example, you might refer a customer to a financial planner or a life insurance representative and you want to record this fact. Click Add Referred To to assign the person. You cant enter the persons name into this field.
Referrals
Contains the total number of referrals the customer has given you. This number is updated automatically when you assign customers as the referral sources. It can't be modified.
Last Campaign and Date
Contains the name and date of the last marketing campaign completed. You can search this field.