The User Registration screen contains information about multiple Market Quest users on the Multi-User Enterprise System. Each registered user has a registration screen where their information is stored. There are also features for adding and removing users.
A user must have the Market Quest System Administrator Option marked to access these multi-user options.
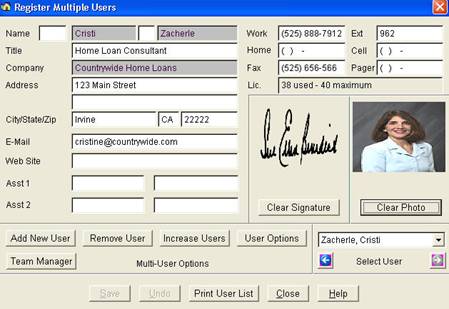
To display the User Registration screen:
Select File / Administration /
View User Registration or click .
.
You can change any information except the first and last name, and the company name.
The following are key fields and functions:
· E-Mail All users must have an e-mail address in order to e-mail letters.
· Password This is optional.
· Get Signature File Select a user first and then select a scanned image file for each user. Optional.
· Get Photo File Select a user first and then select a digitized image file for each user. Optional.
To change user information:
1.
Select File / Administration / View User Registration or click .
.
2. Select a user from the User list at the bottom right.
3. Change the desired information and click Save.
To add new users:
1. Display the User Registration screen.
2. Click Add New User.
3. Insert the Enterprise System Registration Disk and click OK.
4. Enter first and last name and other pertinent information.
5. Press Save when you finish entering data.
6. A warning appears to make sure that the name entered is spelled and punctuated correctly. Click OK.
7. The name cannot be changed once you register it, so it is important to make sure it is correct!
8. After the user is registered, the sales rep's name appears in the names list.
To remove users:
1. Display the User Registration screen.
2. Select the person to remove from the list of users.
3. Click Remove User.
4. Insert the Enterprise System Registration Disk and click OK.
5. If there are customer and contact records assigned to the removed user, the following message displays: There are unassigned records. Assign a sales rep? Click Yes to display a list of sales reps. Select a person from the list and click Select. All customer and contact records that were assigned to the removed sales rep are assigned to the person you selected.
6. Click No to postpone assigning these records to a sales rep. However, you will not be able to print until you assign a sales rep to all unassigned customers and contacts. If desired, you may enter the customer and contact databases and assign different sales reps to these unassigned records one at a time. This is done by selecting a loan office in the list of owners.
To increase maximum users:
The Increase feature allows you to increase the maximum number of licensed sales reps that can be added to Market Quest. The maximum number of licensed sales reps is 150. You can add sales reps one at a time for up to 15 sales reps, and then in blocks of 5 users for up to 150 sales reps.
1. Call Market Focus to order an increase in the number of licensed sales reps. Market Focus will process your order and issue you a new authorization number.
2. Start Market Quest and display the user registration screen.
3. Click Increase Users.
4. Enter the number received from Market Focus, Inc. into the screen and click OK.
5. Insert Enterprise System Registration Disk and press OK.
6. Use the Add New User feature to add sales reps.
Market Quest Teams
You can organize Market Quest users into different teams. When you create teams, a user can be designated to view all team members data. The Team Manager provides the features to manage and create teams. See the Organizing Users into Teams section for more information on creating teams.
To create a team:
1. Click Team Manager.
2. Move users into the team list.
3. Designate at least one person to view all other team members data.
4. Close and name the team.
Market Quest User Options
Each user can be assigned different options, which gives them permission to access various Market Quest features. The following options are available:
· Access to All Users Mark this if you want a person to see all sales reps data. If unmarked, a person can only view his or her own data.
· System Administrator Mark this if you want a person to have access to all critical management functions, such as Adding and removing users, changing passwords, backing up data, etc.
· Access to All Team Users Mark this if you want a person to have access to all team users data. This option has no effect if the user is not a member of a team.
· Access to All Letters Mark this if you want a person to have access to all basic Market Quest letters. Since these are common letters used by all users, you dont want everyone editing them. If unmarked, users can create letters for their own marketing needs.
To set user options:
1. Select a user from the list and click User Options.
2. Mark the Options and click OK to save.