The import setup wizard guides you through the steps required to import data from a file, such as an Excel spreadsheet or a text file. Select Import File from the Read Data From List.
The Import Template Manager manages the process for creating and editing templates.
It has the following features:
· New Create a new template.
· Edit Edit an existing template.
· Rename Renames a template.
· Delete Deletes a template.
To create a new data file template:
1. Click New.
2. Enter a template name and click Next.
3. Select Import File Type. The file type describes the format of the data to be imported.
4. Click Next.
5. Select the type of people you are importing. Market Quest cannot import both customers and contacts from one data file.
6. Click Next.
7. Indicate the status of the people being imported:
· Clients All imported people will have the Market Quest status field set to Client.
· Prospects All imported people will have Market Quest status field set to Prospect.
· Use Status field Select if the imported data has a status field that can be mapped to the Market Quest status field.
8. Click Next.
9. Click Select File to select the file to import and then click Next.
10. Market Quest displays one record read from the import file and displays it in the left list.
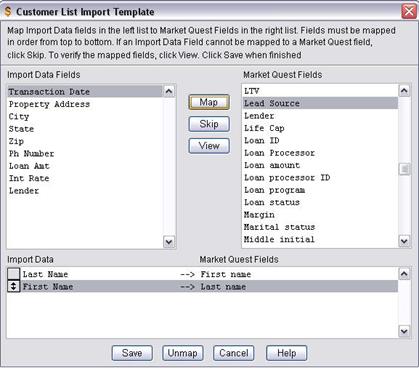
11. Select the first item in the import data list. Select the Market Quest field that corresponds to this data item and click Map.
12. Continue mapping import data fields with the Market Quest fields. Make sure you go in the order or the list. If there is no corresponding Market Quest field, click Skip.
13. Click View to see the mapping between Market Quest and the data being imported.
14. Click Save and then Close when finished.
15. Once a template is created, select it from the Read Data From list and click Read Customer or Read Contacts to import data.
16. To select
a different file to import, click  and select the file. The file needs to have
the same order of fields; otherwise the data will not map correctly with Market
Quest fields.
and select the file. The file needs to have
the same order of fields; otherwise the data will not map correctly with Market
Quest fields.