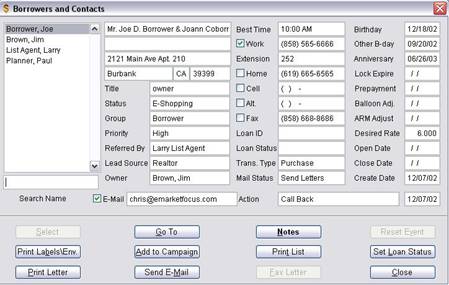
The Card File View screen is used in many of Market Quest features to display customer and contact information. The Card File View displays various groups of people in the following situations:
· Card File View Icon - displays customers and contacts
· Lookup - if more than one customer or contact is found
· Group Lookup - list of customers or contacts found
· Show Contact List - from the Customers database shows list of contacts
· Show Customer List - from the Contacts database shows list of customers
· Event Monitor - shows a list of people for various events, such as call backs, anniversaries, interest rate watch, etc.
Searching for a Name in the Card File View
1. Enter the last name in the Search Name field.
2. If all customers and contacts are displayed, the list will first contain all people whose last name begins with A. When you enter a different last name in the Search Name field, the list shows all people whose last name begins with that letter.
3. If the list doesn't show all customer and contacts, Market Quest searches only for people displayed in the list.
Note: The Card File View icon on the Market Quest main menu only displays a limited number of people to conserve memory. Enter the last name of the person in the Search Name field to find a specific person.
Select Button
Depending on the Market Quest feature, the Select button allows you to select a person from the list in the Card File View. Otherwise, it will be dimmed to indicate that it is unavailable. The Select button is available to select people for related parties groups or referral sources.
Go To Button
1. Highlight a person in the list and click Go To to move to the full record in the Customers or Contacts database.
2. To return to the Card File View, click the Return to Card File View button at the bottom of the screen.
Notes Button
Market Quest displays the notes window.
Reset Event Button
When you select an event from the Event Monitor (see View / Event Monitor), a list of people displays in the Card File View. Click Reset Event when you have finished with the event, such as calling someone or entering a new date.
Print Labels
Click Print Labels to print labels or envelopes to the highlighted person or for all people in the list.
Add to Campaign Button
Click Add to Campaign to add the highlighted person or the entire list of people to a campaign. A list of eligible campaigns displays. See Managing Marketing Campaigns for more information on adding people to campaigns.
Print List Button
Print the list of people displayed.
Caution: If the Card File View icon is selected to display all customers and contacts, Print List will print every person in the database.
Set Loan Status Button
When you highlight a customer and click Set Loan Status, the Loan Status screen displays. You can set information in this screen and it will be merged into status letters for the customer and all people in the related parties group.
Print Letter Button
1. Highlight a person and click Print Letter.
2. Select a letter from the list. The person's notes are updated with the time and the name of the letter sent.
Send E-mail Button
1. Highlight a person and click Send E-mail.
2. Select an e-letter from the list. The person's notes are updated with the time and the name of the letter e-mailed.
Fax Letter Button
1. Highlight a person and click Fax Letter.
2. Select a letter from the list. The person's notes are updated with the time and the name of the letter faxed.